
In short: WooCommerce notifies the shop about only a few events: new, cancelled and failed orders. Every recipient gets the same messages, whether they’re in the warehouse or doing the books. When several people handle orders, a better rule is: every stage has its own recipient. Below we show how to plan those notifications and set them up so nobody has to forward orders by hand.
How do many shops handle orders today?
The order lands in the owner’s inbox. They forward it to the warehouse, message the paint shop on a chat app and, at the end of the month, remind the accountant which orders need an invoice. It works while there are a few orders a day. Then the problems start:
- a bottleneck: everything goes through one person, and when they’re away, orders stall,
- lost information: a chat message is easy to miss and hard to find a week later,
- no history: nobody knows who was told about an order and when.
Which shop notifications does WooCommerce send by default?
In WooCommerce → Settings → Emails you’ll find three messages for the shop:
| When it’s sent | |
|---|---|
| New order | After checkout |
| Cancelled order | When an order is cancelled |
| Failed order | When a payment fails |
You can add several recipients to each, separated by commas. There’s one limitation, but it’s a big one: notifications only cover these three events. When an order moves into production, painting or needs an invoice, WooCommerce tells nobody.
How to plan team notifications
Assign stages to people
Write down who in your shop is responsible for each stage of an order. An example for a furniture shop:
| Person or department | Status that triggers their e-mail | What they need to do |
|---|---|---|
| Warehouse | Picking | Prepare materials and parts |
| Production | In production | Build the piece to order |
| Paint shop | Being painted | Paint in the chosen colour |
| Dispatch | Ready to ship | Book transport for oversized goods |
| Accountant | Needs invoice | Issue the invoice or check VAT details |
| Owner | Complaint | Contact the customer |
One status, one responsibility
Each notification should have a clear recipient and a clear task. If everyone gets every e-mail, in practice nobody feels responsible.
Say what to do in the message
A team notification doesn’t need to be polite or long. It should say what to do and by when, e.g. “Order {order_number}: pick the parts by 2pm today”.
How to set up team notifications, step by step
WooCommerce doesn’t send notifications at custom order stages, so you need a plugin. We’ll show it with Custom Order Statuses & Email Notifications.
Step 1: add statuses for your stages
Add statuses that match the stages in your plan, e.g. “Picking”, “In production”, “Being painted”. See how to add a custom order status in WooCommerce.
Step 2: enable the team e-mail
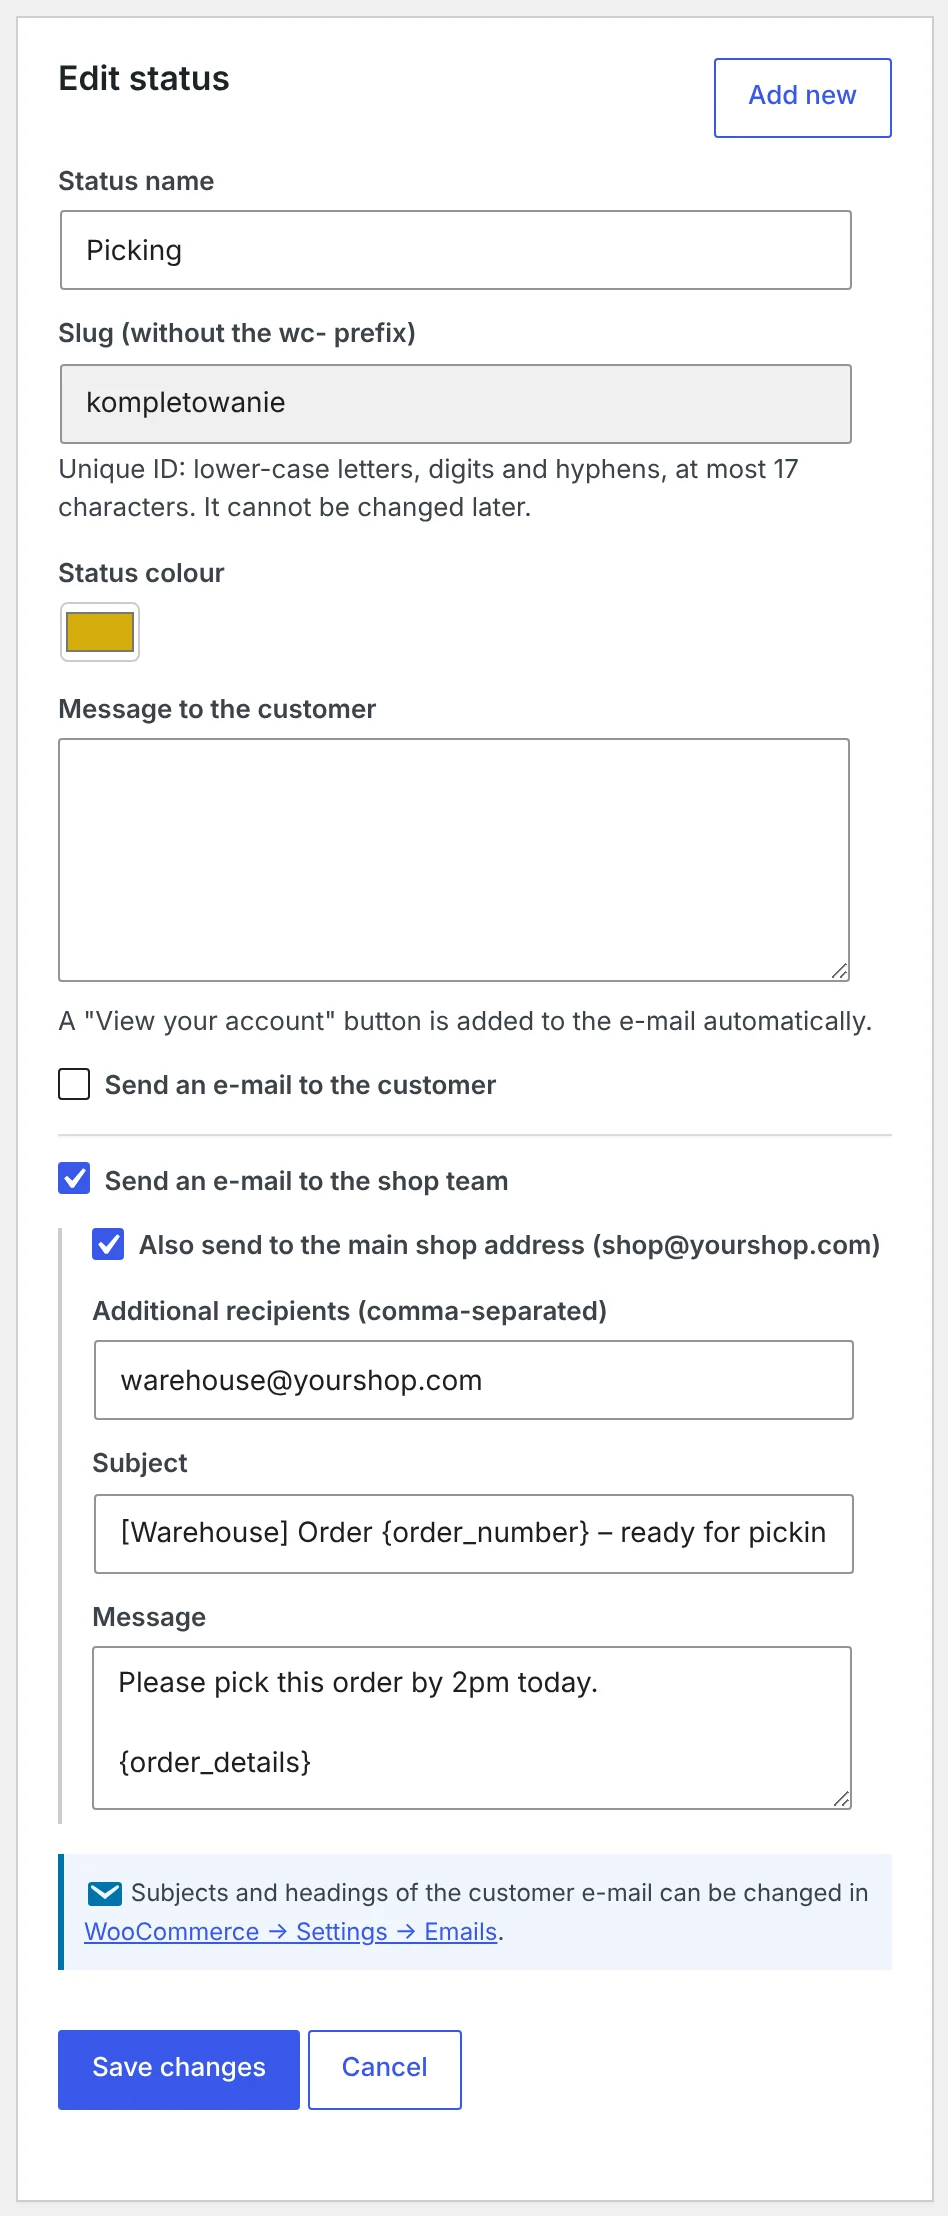
In the status settings, tick Send an e-mail to the shop team. You can also send it to your main shop address and add additional recipients separated by commas, e.g. warehouse@yourshop.com.
Step 3: set the subject and message
Enter a subject, e.g. “Order {order_number} – ready for picking”, and a short message with the task. You can use placeholders such as {order_details} so the product list and shipping address are right there in the e-mail.
Step 4: check the message
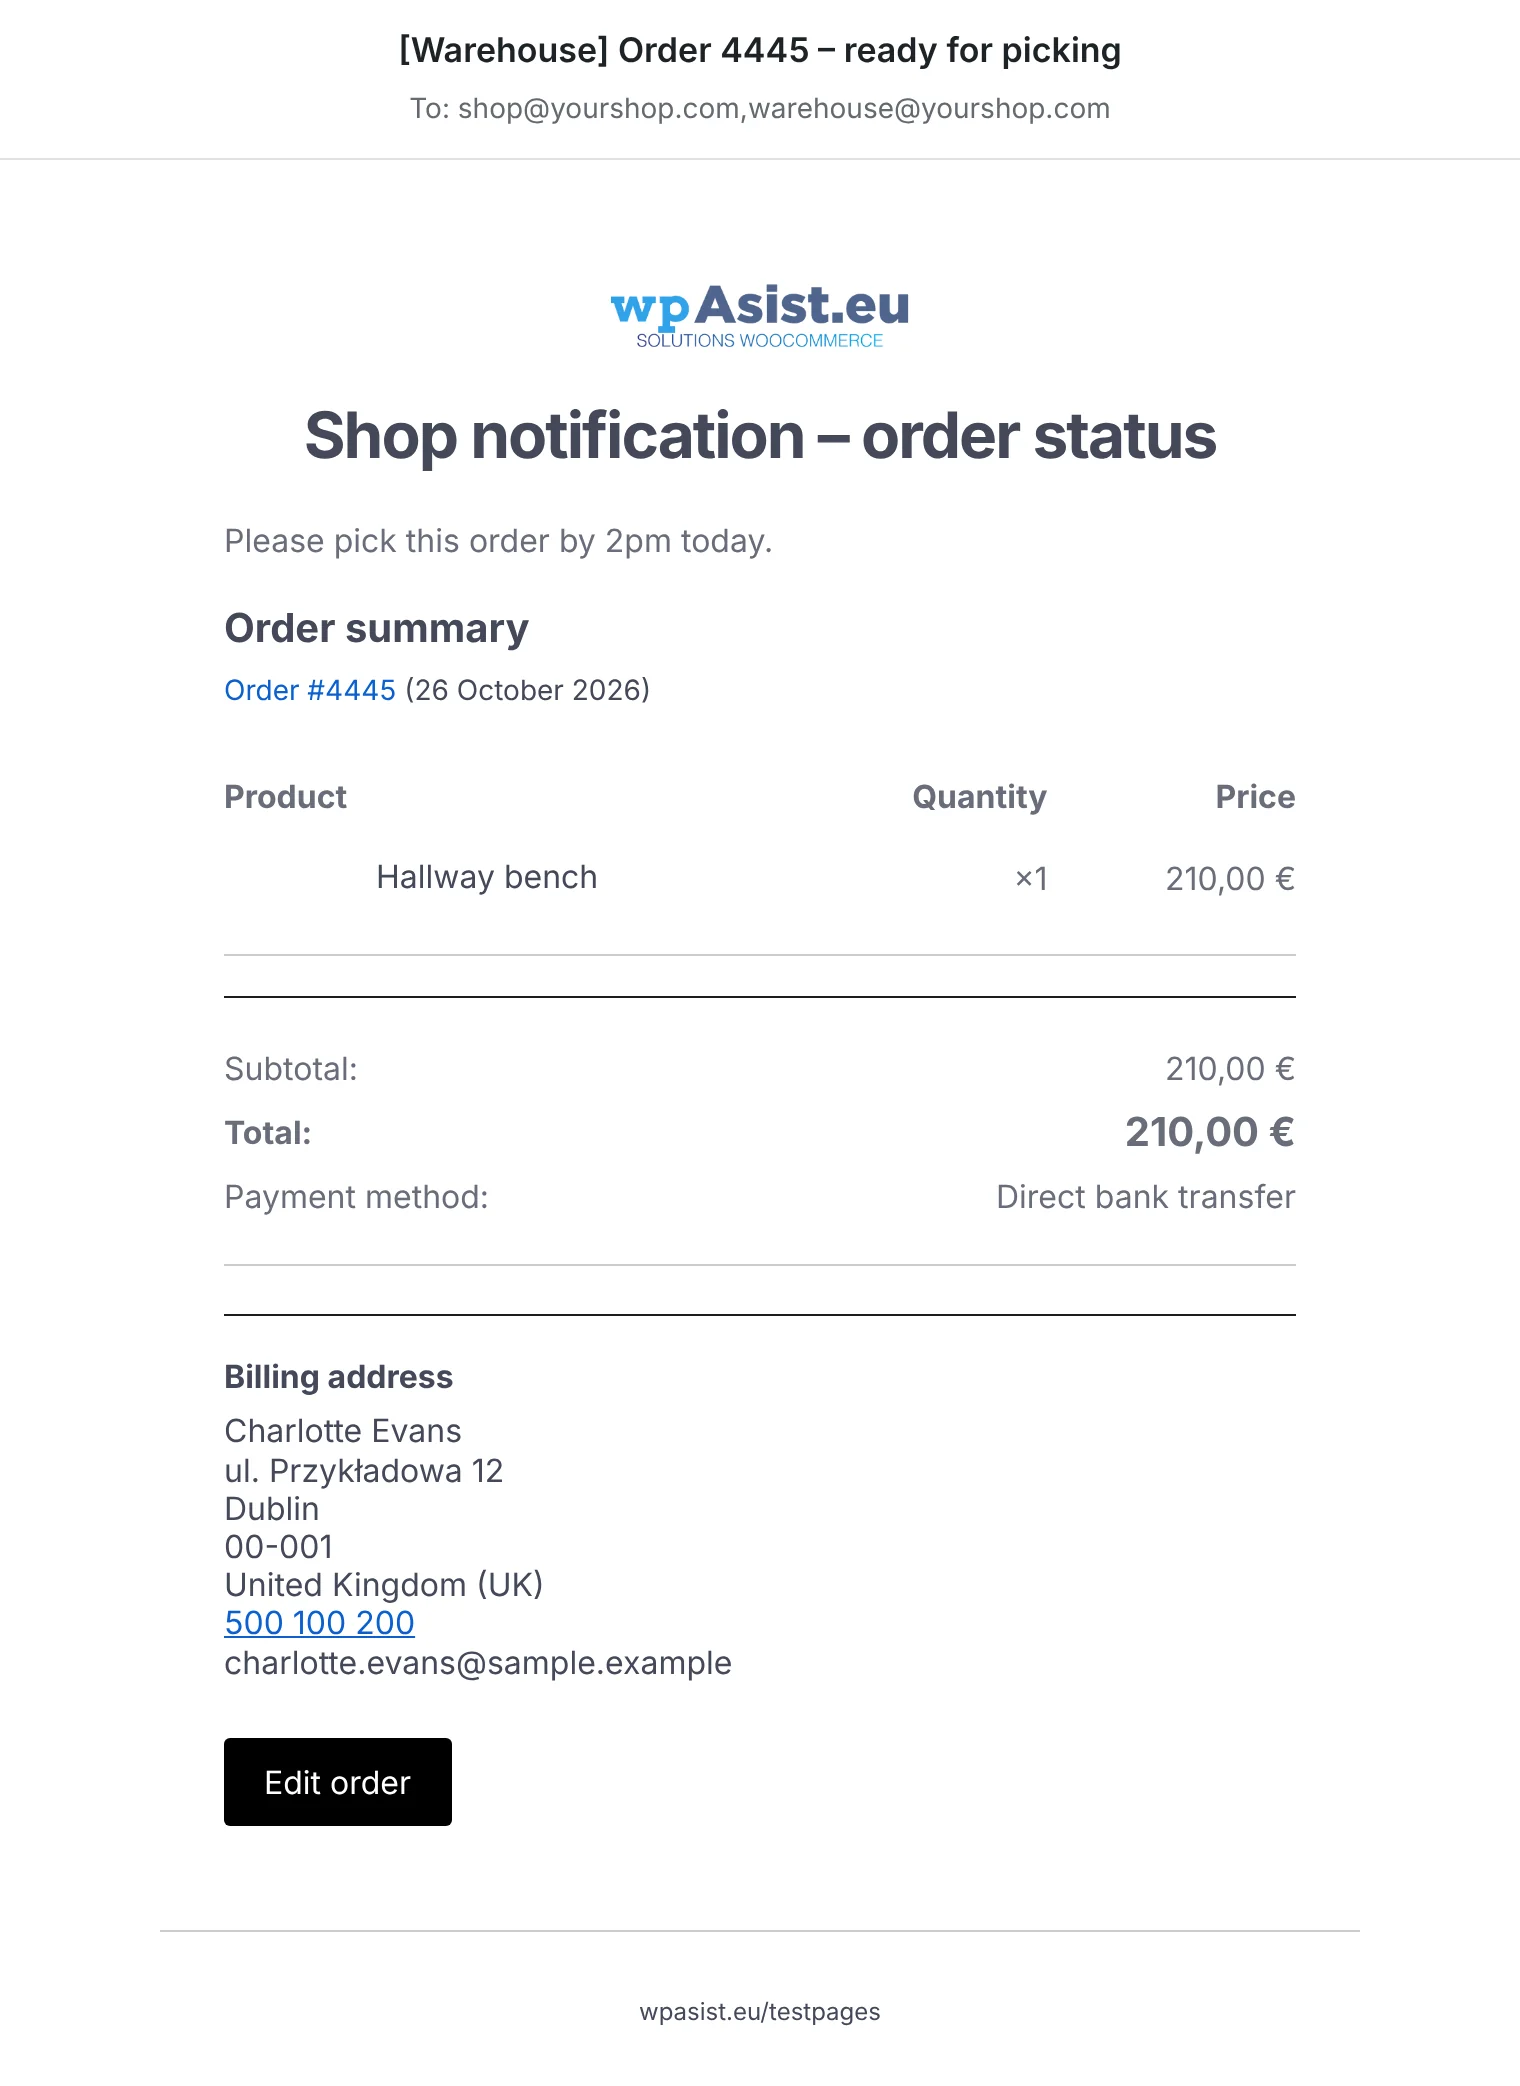
Change the status of a test order. Your team member gets an e-mail with a button that opens the order straight in the dashboard. The order notes record that the notification was sent.
Combine notifications with automatic statuses
The biggest time saver is combining notifications with automatic rules. Example: an order with local pickup and cash payment automatically gets the status “Prepare for pickup”, and the warehouse gets an e-mail straight away. Nobody has to pass anything on by hand. We show how to set up those rules in how to change WooCommerce order status automatically.
Things to watch out for with team notifications
- Dashboard access. The button in the e-mail opens the order in the WordPress dashboard. Your team member needs an account with access to orders, e.g. the “Shop manager” role.
- Personal data. Notifications can contain customer details such as addresses. Send them only to people who need them, and to company mailboxes, in line with GDPR and your company’s policies.
- Don’t double up. If the warehouse already gets the “New order” e-mail, don’t send another at “Processing” unless it means something different.
- Inbox filters. A fixed subject prefix such as “[Warehouse]” makes it easy to set up filters and folders.
Frequently asked questions
Can WooCommerce send an e-mail to my warehouse?
Yes, but only for new, cancelled and failed orders. Add the warehouse address as a recipient of the “New order” e-mail. WooCommerce doesn’t send notifications at later stages.
How many people can be notified about one status?
As many as you like. Enter the addresses separated by commas.
Does a team member need an account on the shop?
Not to read the e-mail. To open the order with the button in the message, they need an account with access to orders.
Can the customer and the team get different messages at the same status?
Yes. You set the subject and text of the customer e-mail and the team e-mail separately.
Can I see in the order that a notification was sent?
Yes. Every e-mail sent leaves a note on the order, so you know who was informed and when.
2 November 2026 · 5 min read
How to Send a Customer a Payment Link for a WooCommerce Order
A phone order, an extra payment after a change, or a payment that didn't go through – in…
1 November 2026 · 6 min read
How to Send Customers an Email When a WooCommerce Order Status Changes
WooCommerce only tells customers about a few moments in an order's life. See which e-mails it sends on…
31 October 2026 · 6 min read
How to Change WooCommerce Order Status Automatically by Payment and Shipping Method
Local pickup, cash on delivery, parcel lockers – and in WooCommerce they all land in the same status.…
30 October 2026 · 6 min read
How to Edit a WooCommerce Order After It’s Been Placed – Even When It’s Paid
A customer calls to add one more product, but WooCommerce won't let you touch the order any more.…
29 October 2026 · 5 min read
How to Rename Order Statuses in WooCommerce (e.g. “Processing”)
"On hold" sounds like a problem, and "Completed" doesn't tell the customer whether the parcel is on its…
28 October 2026 · 8 min read
How to Add a Custom Order Status in WooCommerce – No Code, With Your Own Colours
WooCommerce comes with a handful of built-in order statuses, but no way to add your own. Learn when…
4 November 2026 · 5 min read
How to Get Allegro Orders into WooCommerce Automatically?
Handling Allegro orders in one panel and store orders in another means retyping addresses, parcel locker codes and…
4 November 2026 · 7 min read
How to Send WooCommerce Invoices to KSeF Automatically (Poland’s e-Invoicing System)
Poland's KSeF e-invoicing system changed how online shops issue invoices. Here's who it applies to and when, what…
3 November 2026 · 6 min read
How to List WooCommerce Products on Allegro in Polish from a Multilingual Store?
Allegro buyers search in Polish, Allegro has its own categories and required parameters, and titles are limited to…
2 November 2026 · 7 min read
How to Sync WooCommerce Stock and Prices with Allegro When Your Store Uses EUR?
Selling the same products in a euro-priced WooCommerce store and on Allegro in złoty raises two questions: how…